A wooden fence is the epitome of the perfect backyard. Keeping your little ones and your four-legged friends contained, increasing privacy, and creating a functional outdoor area.
Along with the perfect fence comes fence maintenance. Fence staining and sealing are essential for keeping your fence in optimal condition.
Here is our ultimate guide on when and how to stain your wooden fence.
When Should You Stain Your Fence?
If you have put up a brand new fence, you need to wait at least one month, if not more, after installation before staining your wooden fence. This is to make sure the wood is completely dry and cured before sealing it with a stain.
Plan Your Fence Staining Day
Ideally, you want to pick a sunny day when it’s not supposed to rain for at least 24 hours after you will complete your project. It is a good idea to try to get it done all in one day or a few days, so a long weekend might be the best time to plan to stain your fence.
Prepare & Clean Fence
Before you apply the stain, your fence needs to be properly cleaned and prepared. Even if the fence is relatively new.
A pressure washer is the easiest way to clean a fence. It might be a good idea to look into professional cleaners with residential services who can clean your fence for you a few days before you plan on staining it.
You can also hire them to routinely clean your fence to keep it free from debris and mold.
If your fence has been previously stained, you will need to apply a finish stripper and use a brush to get the previous finish off of the wood.
Spot Clean
Mix vinegar and water together to make the ultimate mold and mildew cleaner. sprat and spot clean all the mold off your fence before you stain it.
Patch Imperfections
Patching any holes or breakage with wood filler will keep your fence looking in tip-top shape. Be sure to replace any broken pieces of wood.
Applying Stain
After your fence is clean, prepped, and completely dry – it’s time to stain! You will need your application of choice, and fence stain. Make sure the stain you choose is waterproof and is a sealant. This will prevent you from having to do the additional step of sealing your fence.
The container of stain will tell you how much square footage it will cover. Keep in mind that you will be staining both sides of the fence, and possibly doing more than one coat.
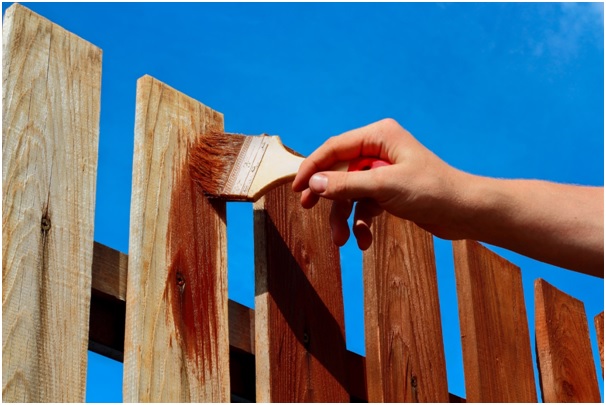
Brush
When using a brush to stain your fence, it is very important that you work from top to bottom and don’t get too much stain on your brush at a time. Paint in a vertical direction and try to avoid streaks in the stain.
Roller
Choose a medium or small-size roller and work top to bottom in large vertical strokes. You may need to go back through with a brush to get any indents or grooves that the roller missed.
Sprayer
A sprayer is the quickest and easiest way to stain your fence. Read the owner’s manual of the sprayer you are using, you may need to dilute your stain or use a specific kind of stain with the sprayer you are using.
Stand back and spray away, working from top to bottom.
Second Coat & Sealer
Depending on your wood and your stain, you may need to apply a second coat. If the stain you chose isn’t waterproof you will also need to apply a wood sealer to prevent rot.
Once your fence staining project is complete, visit the rest of our blog for more home projects and the answers to all your burning questions.


